Creating Buoyancy without Reactor
Now that I've shown you Flex can be used to simulate water ripples, you may be wondering about the other part of reactor water simulation in 3ds Max 2012: buoyancy. Buoyancy, which causes objects to float on water, is a little trickier now that we don't have Reactor. To accomplish this, we'll have to use a script controller for position and rotation. Fortunately for us, Shawn Lewis over at Script Spot, released a handy little MaxScript called Follow Surface which allows us to make objects float on the water with very little work. I've tested this script in 3ds Max 2012 and it works flawlessly.
- First, download the buoyancy_begin.max.
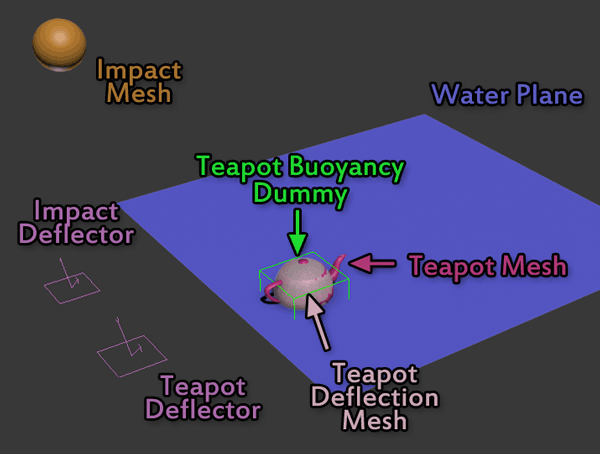
- The scene is shown in Figure 1.
- Select the impactDeflector and pick the impactMesh for the Object-Based Deflector Item. This will drive the big water impact ripple.
- Select the teapotDeflector and pick the teapotCollision geosphere for the Object-Based Deflector Item. Do NOT select the teapotMesh for the collision model. The way we are setting up the scene, this would cause an infinite loop and break the world. Seriously, Max will not be happy. Max will be angry. If the Flex modifier doesn't let you choose the teapotDeflector during setup, it is because you tried to anger Max.
- Select the teapotDummy, then choose MaxScript Menu > Run MaxScript ... and select the follow_surface.ms file you downloaded and extracted from before.
- Click the Scene Object button and pick the waterPlane.
- Set Time Delay to 3.
- Click MAKE ROCKET GO NOW! This will add script controllers to the dummy's position and rotation and creates a new dummy called the teapotDummy_position_dummy001.
- Select the teapotDummy_position_dummy001 and move it above the water. Your new script controllers use this dummy to calculate a ray between it and the waterPlane. If the waterPlane's mesh goes above this dummy, it will break the effect.
- Link the teapotMesh to the teapotDummy.
- Link the teapotCollision object to the teapotDummy_position_dummy001. As above, if you try linking the teapotCollision to the teapotMesh or the teapotDummy, you might make Max angry (read: crash 3ds Max) when choosing deflectors. If you want to move the teapot around during the animation, you can achieve this by moving the teapotDummy_position_dummy001.
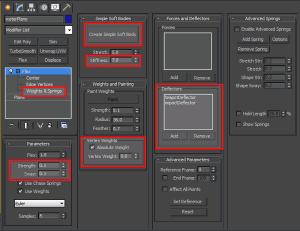
- Now select the waterPlane and add a Flex modifier to the stack. Figure 2 illustrates the Flex modifier configuration after the following steps.
- Set Parameters > Strength and Parameters > Sway to 0.1
- Set Simple Soft Bodies > Stiffness to 7.0
- Go to the Weights & Springs sub-object level, or press 3. Select all vertices and check the Weights and Painting > Absolute Weight checkbox. This will make it so the center of the water is deformed as much as the sides. All vertices should now be blue to indicate the low weight.
- Add the two deflectors under the Forces and Deflectors > Deflectors section.
- Now go to Frame 0 and click the Simple Soft Bodies > Create Simple Soft Body button.
- If you want to preview the animation, you'll probably want to cache it and disable the Flex modifier so it doesn't slow your computer down.
- Add a Point Cache modifier to the waterPlane.
- Click the New... button and choose a location to save the cache.
- Click the Record Button. The Point Cache modifier will now go through frame by frame and save the animation to disk. Sometimes the Cache Info box updates with the frame number, but other times 3ds Max will be unresponsive while it's writing the file. Just give it a minute and it should complete successfully.
- Once the animation has finished recording to cache, click the Disable Modifiers Below button. This will stop Max from trying to calculate the Flex modifer on the stack and free up CPU time.
- Add a TurboSmooth modifier to the stack to enhance the look of the ripples.
If, after watching the animation you want to adjust the Flex modifier on the waterPlane, go to Frame 0, then enable the Flex modifier and make your changes. When you're done, repeat steps 22. and 23. to update the PointCache modifier.
Related Posts:

