AE Interoperability
The 3ds Max 2012 Subscription Advantage Pack was recently released. Features include iray 2.0, better SDK support, and a render pass system called State Sets which plays well with Photoshop and After Effects CS4 and CS5. This article will focus on the After Effects interoperability features provided by the State Sets interface. The interoperability features support the transfer of standard 3ds Max Cameras, Lights, Planes (as Solids in AE), Helpers (as Null objects in AE), and footage rendered via the State Sets interface.
Install the After Effects Interoperability Plugin for AE CS4/CS5
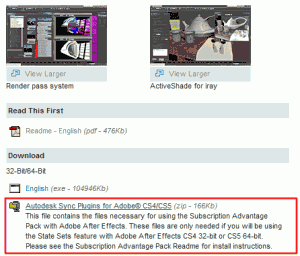
To use the After Effects interoperability features with After Effects CS4 or CS5, you'll need to download and install the Autodesk Sync Plugins for Adobe CS4/CS5 from the Autodesk Subscription website. Rumors have it, these will be available in 3ds Max 2013. Once you've downloaded the file and unzipped the contents, copy the appropriate files to their corresponding After Effects program directories.
For After Effects CS4 32-bit
- Copy Adobe.AfterFX.dll and Autodesk.Plugins.Adobe.AfterFX.SceneIO.dll from the CSx32/Support Files/ folder to the AE/Support Files/ folder.
- Copy Autodesk.Plugins.Adobe.AfterFX.SceneIO.Loader.aex from the CSx32/Plug-ins/AEGP/ folder to the AE/Support Files/Plug-ins/AEGP/ folder (create the AEGP directory if needed).
For After Effects CS5 64-bit
- Copy Adobe.AfterFX.dll and Autodesk.Plugins.Adobe.AfterFX.SceneIO.dll from the CSx64/Support Files/ folder to the AE/Support Files/ folder.
- Copy Autodesk.Plugins.Adobe.AfterFX.SceneIO.Loader.aex from the CSx64/Plug-ins/AEGP/ folder to the AE/Support Files/Plug-ins/AEGP/ folder (create the AEGP directory if needed).
Once you've installed both the Subscription Advantage Pack (which includes 3ds Max 2012 SP2) and the Sync Plugins, you're ready to start working between 3ds Max and After Effects.
Using State Sets in 3ds Max and After Effects
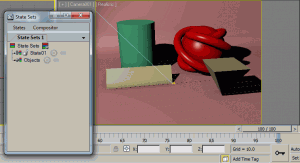
With State Sets, users can manage render passes within 3ds Max and export them to After Effects or Photoshop. Render passes can be managed via the Render > State Sets menu. When you first open 3ds Max, it will be configured as shown to the right.
Create an Ambient Occlusion Pass
- Add a new State to the project and label it AO_State.
- Create a new state by choosing State > Add State from the State Set window menu, clicking on the Add State button, or right-clicking on the parent State Set and choosing Add State.
- Select the newly created State02, then left-click on the name and rename the state to AO_State.
- Click the record button next to AO_State. With the record button active, most changes made to the scene, including hiding objects, changes in materials, lighting, and even the renderer will be stored in the selected State Set.
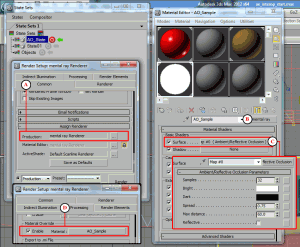
- Change the renderer to mental ray (A in the figure to the right). To do this, open the Render Setup window (F10) go to the Common tab if it's not already active, then go to the Assign Renderer rollout. Click the ellipses next to Production Renderer and choose mental ray.
- Create a mental ray material (B) called AO_Sample. Add an Ambient/Reflective Occlusion map (C) to the Surface map slot. I've adjusted the Ambient/Reflective Occlusion map for my scene, increasing the samples for better detail and the Max Distance to provide better shading in my scene.
- In the Render Setup window, choose the Processing Tab (D), enable the Material Override and assign the AO_Sample material to the Material slot.
- Press the recording button again to commit the changes to the AO_State. At this point, a + will appear next to the AO_State set, displaying the changes you've made to the current state set.
Define a path for the Render Output and render all states
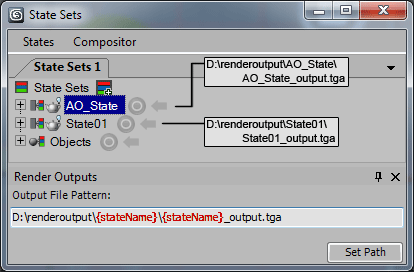
States > Render Output > Output File Patterns are an easy way to keep your files organized and save the renderings from each state.
Instead of assigning path locations for each render pass, you can create an Output File Pattern to automatically save renderings to locations based on each state name using the {stateName} keyword. For example, {stateName}_output.tga would save all AO_State renders as AO_State_output.tga. If you change the Time Output in the Render Setup to Active Time Segment, Range, or Frames, the pattern will automatically add the frame number to the filename. To assign an Output File Pattern, follow the steps below:
- Select the States > Render Outputs... menu item to set the Output File Pattern.
- Set the Output File Pattern to a location you can find. Note that if a folder doesn't exist, it will be created for you. Click the Set Path button when you've decided on a file/folder name.
- Select the States > Render All States menu item or right-click State Sets and choose Render All States. Rendering will complete one state set set at a time and save them to your output file pattern even if you haven't set a file path in the Render Setup window for each of your states.
In the example to the right, I have two states sets, State01 and AO_State. With an output pattern of D:\renderoutput\{stateName}\{stateName}_output.tga, AO_State renders will be saved to D:\renderoutput\AO_State\AO_State_output.tga and State01 renders will be saved to D:\renderoutput\State01\State01 _output.tga.
Change the Blend Mode with the Composite View
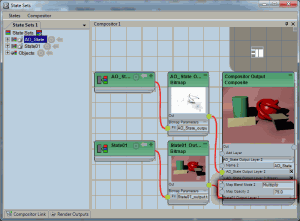
The Composite View allows users to adjust how State Set renders are blended together. This is useful if you want to do some of the compositing work in 3ds Max because the After Effects Interoperability feature supports changes to the blend mode and opacity.
- Select the Composite > Composite View menu item to activate the Compositor window.
- Expand the AO_State Output Layer 2 to adjust the blend mode and opacity of the AO_State state set.
- Left click on the Map Blend Mode 2 and select Multiply.
- Double click on the Map Opacity 2 value and set to 75.
Now when you send the composition to After Effects, the AO_State pass will also have a blend mode set to multiply with an opacity of 75.
After Effects Interoperability (Compositor Linking)
Now that you've rendered your states and created some footage to assemble in After Effects, we're ready to create a Compositor Link.
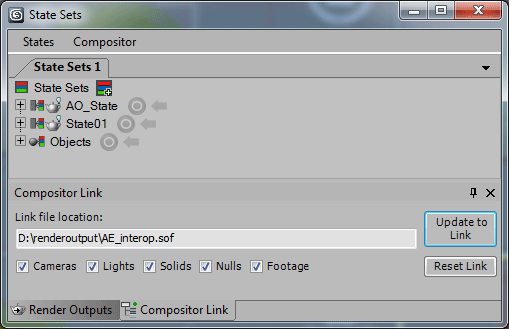
- Choose Compositor > Compositor Link menu item and click the Create Link button. This will create a file which you can open in After Effects for further compositing. The five check boxes determine what will be sent to After Effects.
- Cameras - check this to link the cameras in your scene.
- Lights - check this to link your lights. This seems to work best with standard lights. Spot lights, Direct lights, and Omni lights are converted in After Effects as Spot, Parallel, and Point lights, respectively.
- Solids - checking this will link planes as Solids in After Effects. The nice thing about these is you can modify their locations and dimensions in one application and see the changes in the other.
- Nulls - the nulls checkbox will convert objects in your scene to nulls in After Effects. In After Effects, you can adjust the position, rotation, and scale of null objects and affect their corresponding 3d object's parameters in 3ds Max.
- Footage - check this to send rendered files to After Effects.
- Create Link button - available when you first open the Compositor Link window or after pressing the Reset Link button. This button has two functions. If you select an existing *.sof file, it will load the state sets into the current application. If you create an unused name, it will generate a new *.sof file.
- Update to Link button - this button saves any changes you've made to your State Sets to the 3dsmax State Output File (*.sof) specified by the Create Link button.
- Update from Link button - after Creating a Link or pressing the Update to Link button in one application, you can load the updates into the other application by pressing this button.
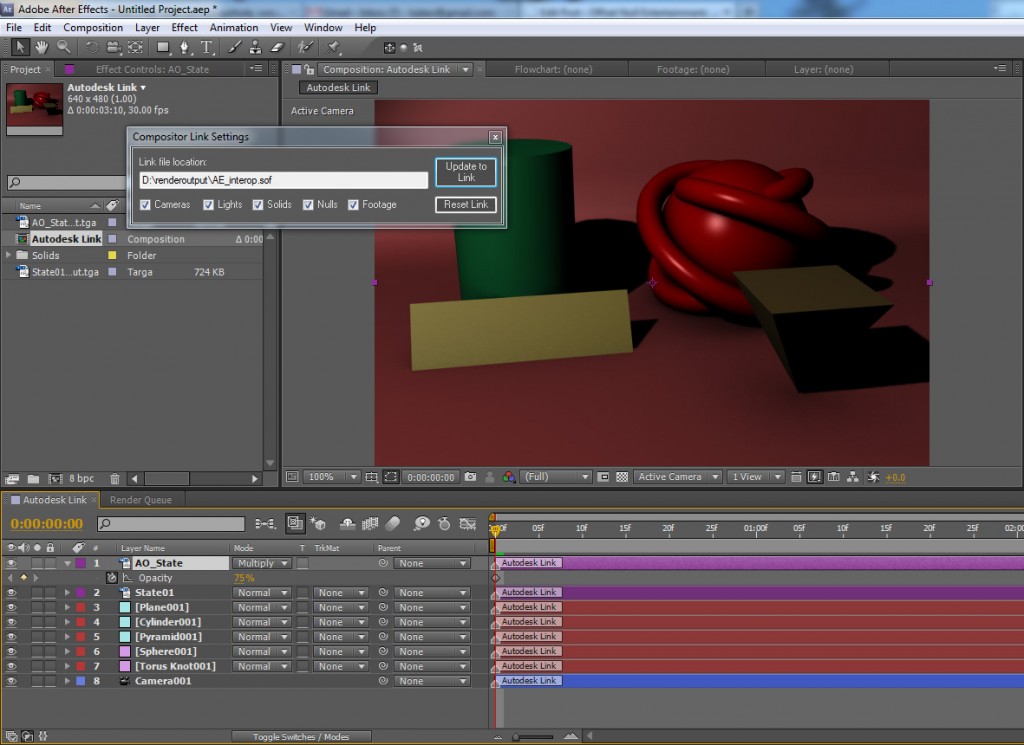
- After saving a 3dsmax State Output File (*.sof) and rendering your state sets (aka render passes), launch After Effects. If you installed the plugin correctly, select File > Open Compositor Link (Autodesk)... menu item in After Effects and a familiar window will appear.
- The Compositor Link window is what gives users the ability to work between 3ds Max and After Effects. When first launched, or after pressing the Reset Link button, the Create Link button will appear.
- Click the Create Link button and select the file you saved in step 1 to recreate your 3ds Max scene in After Effects.
If you adjusted the blend mode in the Compositor view, you'll notice your layers are assembled with the correct blending and opacity in After Effects. Have fun compositing!
October 13th, 2011 - 13:44
Thanks for the overview!!