ZBrush Insufficient Memory Error
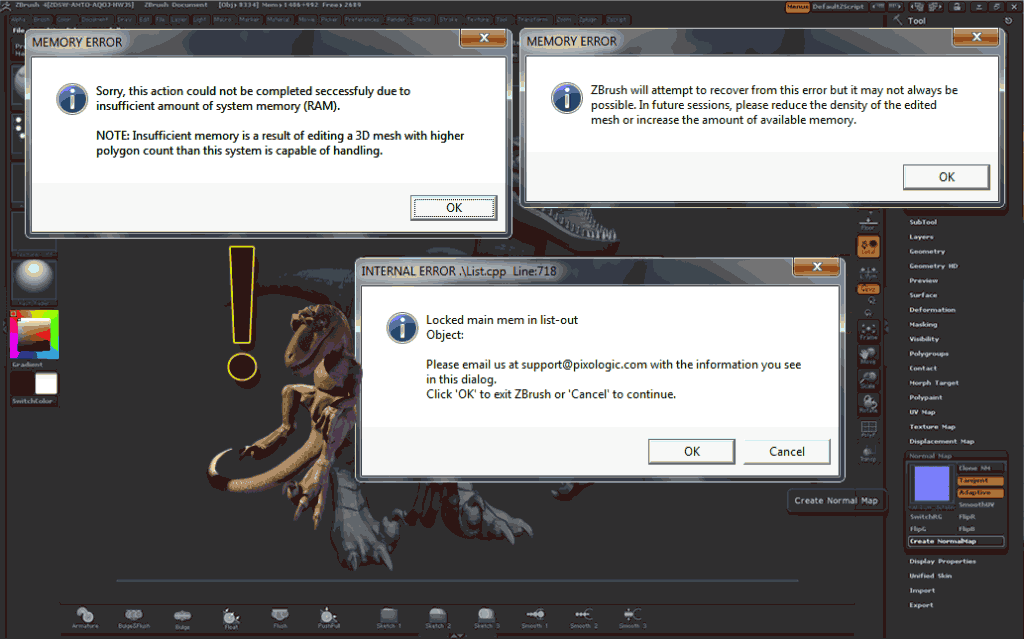
The dreaded ZBrush memory error reared its ugly head as I was trying to create a 4096x4096 adaptive displacement and adaptive normal map for the velociraptor model.
At the highest subdivision, the raptor model reached 13.4 million points. While taxing to the system, ZBrush handled sculpting at the highest subdivision with ease. Our system is pretty beastly and has more RAM than the current 32-bit version of ZBrush can use, so I was a bit confused to see the MEMORY ERROR dialogue appear. Instead of abandoning my work and reducing the model complexity, I decided to consult The Internet.
As it turns out, insufficient memory errors can be caused by numerous issues which all have their own fixes. For reference, our machine was running Windows 7 64-bit SP1 and had plenty of RAM.
Run ZBrush with administrative rights
 Some users reported having luck by simply running ZBrush with administrative rights. If you right click on the icon to launch ZBrush, you can choose Run as Administrator to run ZBrush with administrative rights once, or you can modify a shortcut that launches ZBrush to always run the application with administrative rights. To do this, right click a ZBrush shortcut, choose Properties, then go to the Compatability tab and check the box next to Run this program as an administrator. This will modify the shortcut icon to appear with a shield (see image).
Increase the RAM and virtual memory available for ZBrush
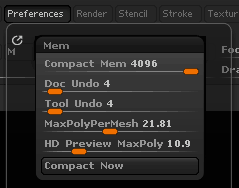
You may be able to fix the error by simply providing ZBrush with more RAM or virtual memory. You can increase the RAM available to ZBrush by increasing the Compact Mem value. Be careful to leave some RAM for your operating system and background processes. For example, if you have 4 GB of RAM in your machine, do not increase the Auto Compact Memory slider above around 3 GB. When the Auto Compact Memory value is the reached, ZBrush issues a Compact Now event and uses your virtual memory.
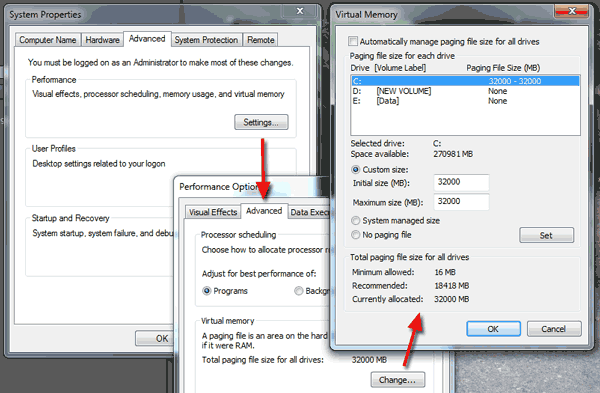
To verify you have enough virtual memory, first, check that your harddrive isn't full. Then, Run (Windows Key + R) systempropertiesadvanced.exe (or Right Click on Computer, go to Properties, then choose Advanced Properties), go to the Advanced Tab, and choose the Performance > Settings... button. Finally, pick the Advanced Tab (again) and click the Virtual memory > Change... button. My virtual memory is around two times my physical memory/RAM at 32,000 MB.
Fix inverted or overlapping UV coordinates
Improper UVs can give ZBrush a hard time, especially when it tries to generate a normal map or displacement map. Though not as fast or efficient as working in 3ds Max, ZBrush has tools to help you find and fix overlapping UVs without leaving the program (however, if you made the UV map using ZBrush's UV Master, you may not have this problem to begin with!).
Use ZBrush to fix inverted or overlapping UV coordinates
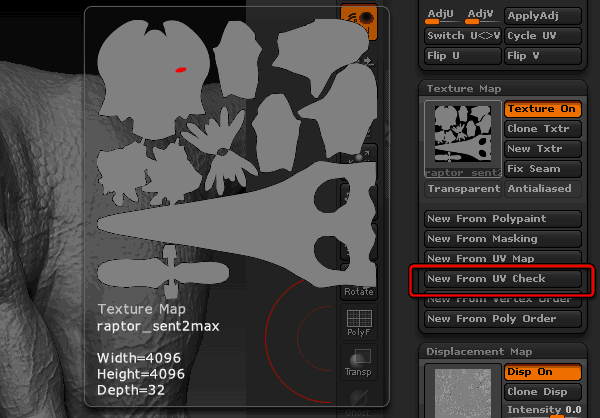
In ZBrush, you can use the Tool > Texture Map > New From UV Check button to create a texture map for your current subtool that highlights overlapping UV coordinates in red. The rest of the model should be a shade of gray. If you have Draw Poly Frame (Shift + F) active, the New From UV Check button also draws a wireframe on the texture map which can make it easier to locate overlapping UV coordinates. If you open the texture map in Photoshop, you can choose Select > Color Range... and Select: Reds to help highlight their locations. Once you've located the offending face, you'll need to adjust the UV map. I'm not a big fan of this method because it can be difficulty to find and fix overlapping faces in ZBrush and I don't think there's any way to help locate inverted faces. Instead, I prefer to use the Unwrap UVW modifier in 3ds Max.
Use 3ds Max to fix inverted or overlapping UV coordinates
Use GoZ or export and import your model to 3ds Max (do it with the same level you created the UV map with, if possible to make working with easier). Select the model and add an Unwrap UVW modifier to the stack. Open the UV Editor and select the face sub-object or press the number 3. Then choose Select >Select Overlapping Faces. Any overlapping UVs will be selected and you can simply zoom in and fix the problem areas. Furthermore, in 3ds Max, you can also check inverted faces by using the Select > Select Inverted Faces menu item. When you're done, send it back to ZBrush using the GoZ menu or by export / importing the model to ZBrush.
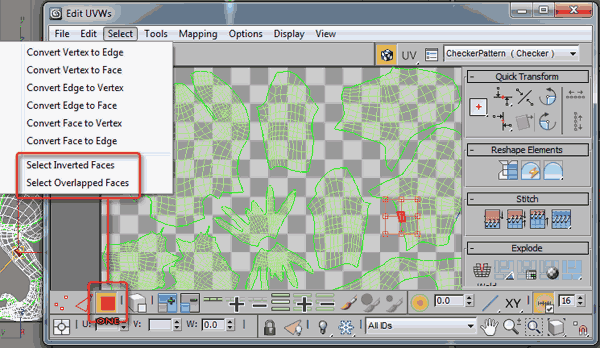
Use the Unwrap UVW modifier in 3ds Max to quickly locate and fix both inverted and overlapping faces.
Reduce the memory ZBrush is trying to request
If you're willing to sacrifice a detail, you can disable the Adaptive Scan Mode for the displacement map or normal map, or reduce the UV Map Size. If the finest details wont show up on your model anyway, you could also remove the highest subdivision of your model.
If you're not willing to sacrifice detail, you could reduce the geometry of your current subtool before creating the texture map, normal map, or displacement maps. You can either change your mesh's topology by retopologizing or optimizing your model or you can split the model into multiple subtools by polygroup, create your maps for each subtool and stitch them together in Photoshop. More on this step, below.
Reduce total points without reducing complexity
If you're truly hitting the memory max and are willing to do a little work, you can explode your current subtool into multiple subtools based on their polygroups. If you haven't already, you can use the Tools > Polygroups > Auto Groups With UV button to create polygroups based on the islands you defined for you UV map.
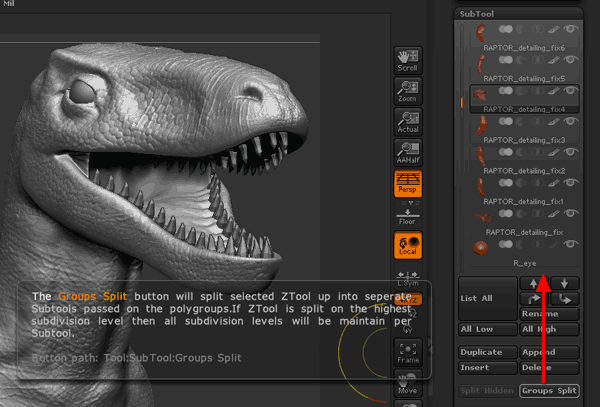
Next, go to the top level of your geometry and press the Tools > SubTool > Groups Split button to create subtools for each poly group. By pressing the Groups Split button on the top subdivision level, your model will retain detail and each of the lower subdivisions.
With fewer points to compute per level, ZBrush may now have enough memory to make the texture map, displacement map, or normal map at the resolution and detail you desire. You may want to collapse subtools together so you have fewer maps to create and export. Either way, before you can use the maps, you'll need to combine them in Photoshop.
A raptor, saved!
After fixing a couple inverted and overlapping faces, I was able to export an Adaptive Displacement map with a DisplacementMap Subpixel Accuracy of 2. However, ZBrush 4 continued to crash when trying to create an Adaptive Normal Map. Perhaps I was truly hitting the memory max. As such, I could either reduce the UV Map size (not going to happen), disable the Adaptive Scan Mode, or reduce the number of total points in the model. Feeling stubborn, I decided to divide the subtool, export a bunch of normal maps, and combine them back together using Adobe Photoshop.
